TABLE OF CONTENTS
- What is the Illuminate Integration Gateway?
- General System Requirements
- What is Docker and why does N2N use this?
- Prerequisites
- Integration Gateway Installation
- 2. Setup Process
- 3. Installation Process
- Integration Gateway setup for PROD on the same QA host/server
- Optional step to autostart the containers after a server reboot
- SSL Certs In Dataport/IIG
- What is an SSL certificate?
- What are Certificate Chains?
- What is SSL Certificate Chain Order?
- There are three parts to the chain certificates
- How To Update SSL Certs In Dataport
TABLE OF CONTENTS
- What is the Illuminate Integration Gateway?
- General System Requirements
- What is Docker and why does N2N use this?
- Integration Gateway Installation
What is the Illuminate Integration Gateway?
The Illuminate Integration Gateway, also called the Dataport, is a tool used to provide the Illuminate platform with access to data that is located in physically and logically secure configurations, such as behind a firewall in the organization’s data center. The Integration Gateway provides a secure, encrypted channel to transport this data to the Illuminate cloud environment, where Illuminate creates a secure Application Program Interface (API) access platform.
How it works?
N2N provides a Docker container that runs Illuminate's Integration Gateway (IIG). This is installed on a Virtual Machine (VM) that is provided by the University and typically hosted on the University's network. The IIG is used to facilitate secure communication between the University database and the Illuminate Platform without having to allow direct external communication to the actual database. VM setup is operating system specific, please refer to your onsite System Administrator for VM setup.What is the current version of the Integration Gateway?
Illuminate Integration Gateway is at Version 4.12
*Note: Prior versions of the Illuminate Integration Gateway were branded "Illuminate Dataport"
What do we provide?
N2N provides a Docker image with the following software packages included:
- Tomcat 9.0.62
- JVM 11.0
- Illuminate Integration Gateway Project 4.12 (the N2N application code)
General System Requirements
General system requirements for installing the Integration Gateway:
Software
Docker 17.x version or higher
Hardware (VM)
4 to 8 CPU Cores (processors)
8GB to 16GB RAM
Enough disk space to run the OS and other supporting software (recommended disk space 40+ GB)
Typically an 8 GB Ram server with 4 Core Processor can serve about 700-800 transactions per second.
For more information about Docker, prerequisites visit this Docker page
What is Docker and why does N2N use this?
What is Docker?
Docker is the world's leading software containerization platform. Docker containers wrap a piece of software in a complete file system that contains everything needed to run: code, run time, system tools, system libraries – anything that can be installed on a server. This guarantees that the software will always run the same, regardless of its environment. Containers isolate applications from one another and the underlying infrastructure while providing an added layer of protection for the application..
For more details about Docker please visit this Docker page
Why does N2N use Docker for the Illuminate Integration Gateway?
The Docker platform provides N2N with a simple, effective way to deliver the right package of software to the Illuminate Integration Gateway. Docker allows N2N to combine tested versions of software with validated configuration files into one deployment package. This process greatly reduces the number of manual steps, which improves reliability and robustness, as well as making deployment faster!
Prerequisites
An SSL certificate ready (self-signed is not supported) which includes .crt file (the .crt file must have the public, root, and
intermediate certs, with public cert on top of the file) and a private key.
Ports 443, 80, need to be open on the VM instance where Docker and Integration Gateway are installed
Firewall rules need to set up by this time. Whitelist N2N NAT IPs below
All the needed connection details to establish a connection with the database
.
QA: 23.20.165.255
PROD: 54.204.165.208
Integration Gateway Installation
Note: This installation works on the Linux Server Distributions. If you are running RHEL with version 7+, use the document Illuminate Integration Gateway Installation using Podman.- Logging into the Illuminate app
QA Prod Note: If you do not have an Illuminate account please contact appsupport@n2nservices.com
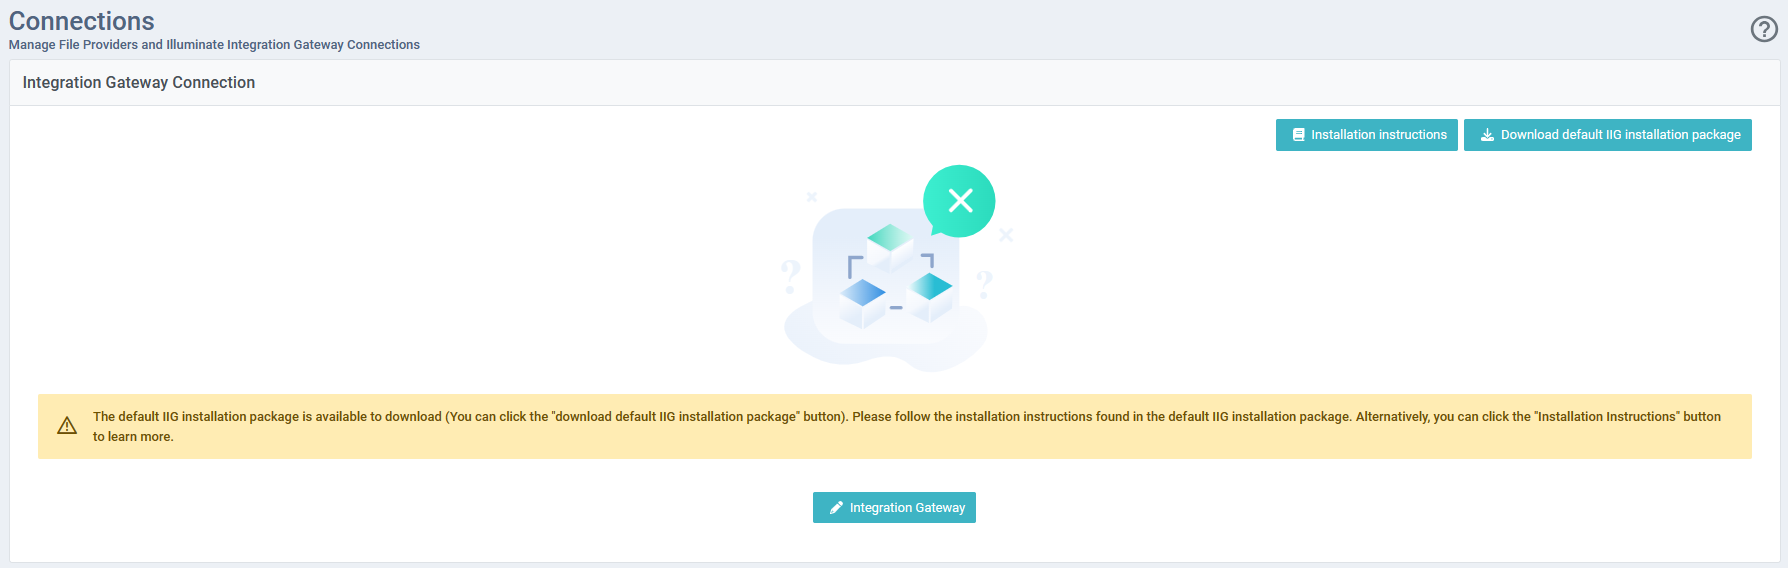
- Configure the Integration Gateway details within the Illuminate App's Connection Module by following the below steps
- From the left-side menu, select the connection button.
- The automation process is divided into THREE steps:
Selecting configuration type
Setup process
Installation process
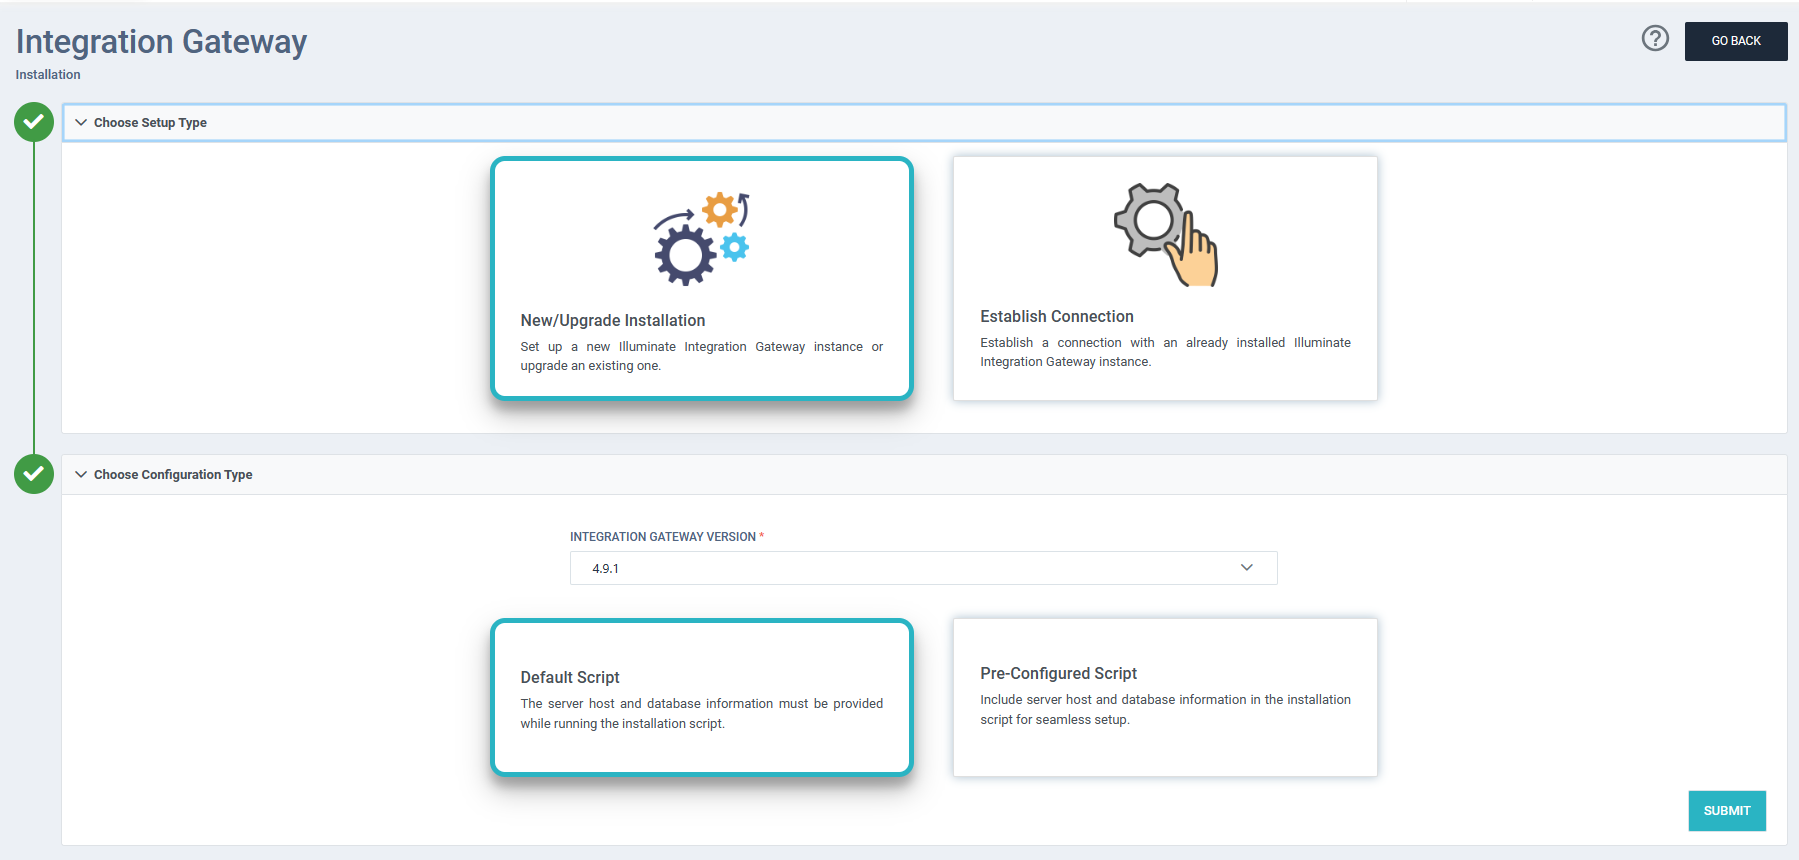
1. Selecting configuration type
This process is divided into TWO types:
Default Script (Recommended):
You will be provided with a basic tar file with an installation script but without database connection details. You can provide database connection details while executing the script by choosing this option.
Pre-Configured Script (Optional):
By selecting this option, you need to provide DB details first in the Illuminate UI and then a custom tar file will be generated only for you with database connection details.
Default Script (Recommended):
Prerequisites:
Valid Illuminate login credentials.
Instance for IIG setup.
Generating a tar file:
- Sign in to the Illuminate application(either QA or PROD) then select “New/Upgrade Installation” and choose the “Default Script” option.
- Once you click “Submit” button a tar will be available to download
Pre-Configured Script (Optional):
Note: Skip this step if you are using "Default Configuration Type" and goto "Setup Process" step directly.Prerequisites:
Valid Illuminate login credentials.
Database connection details.
Instance for IIG setup.
Generating a tar file:
Enter the valid details for the database connection.

Note: This is an example of the menu provided by selecting Pre-Configured Script
If you want to add more database connections click “Confirm & Add More” otherwise click “Save”.
Once you click “Save” button a custom tar will be available to download. We need to use this tar file for installing IIG using pre-configured option.
 Note: Directions can also be referenced from the Installation Instructions button to the left of the download button.
2. Setup Process
Once you upload the tar file onto the server, untar the tar file, and go to that iig-automation-clienthosted directory.
1. tar -xvf iig-clienthosted.tar

2. cd iig-automation-clienthosted

- We need to run the install-prereqs. sh script which installs the required prereqs to run the IIG automation scripts.
1. bash install-prereqs.sh (or) ./install-prereqs.sh
Note: If scripts are not able to run due to the insufficient permissions, give the executable permissions to the scripts.
1. chmod +x <script_name> #Example: chmod +x configure.py

In that step, it will ask you for OS type ( ex:-Ubuntu, Centos etc.). Enter appropriate value.
Once prereqs are installed the IIG scripts are saved under /opt/iig/ directory.
1. cd /opt/iig
Now run configure.py file which is main script to setup the IIG.
1. ./configure.py
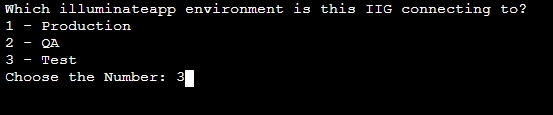
The configure.py script will ask the steps mentioned below

Choose 'Y' if you whitelisted the NAT IPs mentioned in the prerequisites; otherwise, the script will exit at this point as this is mandatory.
Select the specific environment IIG connect. Please choose the environment number based on your requirement(Example: 3).
Choose 'Y' If the ports are opened mentioned in the prerequisites, this will check whether the dataport hosting server can communicate with the illuminate.


Enter your illuminate login details(username and password)
 Step 5
Choose the host configuration(Example: 2)
 Step 6
Select whichever option selected in the Illuminate UI(Either Default or pre-configured).
 Step 7
In this step, we need to setup ssl configuration, if you have your own school's SSL certs and domains then choose N and continue.

Step 7A-[Optional]
Click 'Y’ If you want to create custom SSL certificate for this particular setup we will use LetsEncrypt service to create a new SSL certs for your custom DNS 
Step 7B-[Optional]

Enter the institutions top level domain and fully qualified domain(FQDN) as shown below, once the DNS entered, the script will verify the DNS resolution.
Note: If the DNS is not resolved the scirpt will exit with the valid error message


- Enter the SSL certs location on the server. once entered, the script will check the ssl validation
1. /opt/certs/fullchain.pem   - ssl chain cert

2. /opt/certs/privkey.pem     - private key


- In this step provide database hostname and port and the script will check the connection whether the dataport hosting server is able to reach to the database or not.

- Enter N for this option. This step is under process, and we will notify you in future Updates

Step 10B-[Optional]
- This option is for system configuration, which involves setting up soft and hard limits, memory settings, and IPv4 forwarding settings. You can choose Y or N; choosing Y will apply the settings; otherwise, the system settings are default.

DB Connection Details
Note: This step will be skipped if you select "Pre-configured Script" and goto "Installation process" step directly.
These are the following parameters that are needed to establish the database connection:
S.NO | Parameter Name | Description |
|---|---|---|
1 | database type | Type of the databases(Ex:Oracle, Mysql, Sybase..etc) |
2 | connection name | Name your DB connection |
3 | description | Short description |
4 | hostname | Database hostname |
5 | port | Database port |
6 | username | Database username |
7 | password | Database password |
8 | SID | Database SID |
9 | Service Name | Database Service Name |
Note: The above mentioned fields are mandatory. If any parameter is not required click enter(null value) and continue
Select the numeric option based on your database type.
Provide the mandatory details for IIG connection as provided in the given screenshot.


3. Installation Process
- Go to /opt/iig and run installation script.
- Run the script as root user
1. ./install.sh
- Please choose the Illuminate application environment(QA or PROD)

The console output of the installation process.

Once the install process completes, we can verify the containers are running on the server and iig dns is connected to respective Illuminate account under “Connections” tab.

- Finally, status api checks will show the following results.
1. curl -X GET https://{your dns}/idp/status
| Info | Appendix-1 (IMPORTANT) |
Adding Additional Database Providers To The Existing IIG Connection |
To add one more database provider for the existing setup, run configure-db.py to enter the database details then run the save-multiple-database-connections.yaml script with chosen environment Note: This is possible only if you install IIG using above automation process /opt/iig/install/configure-db.py cd /opt/iig/install ansible-playbook save-multiple-database-connections.yaml -e stage_env=qa or prod |
Integration Gateway setup for PROD on the same QA host/serverIf the client wants to set up a PROD integration gateway on the QA host, they need to follow these steps
|

. Optional step to autostart the containers after a server rebootIf a server is rebooted, restarted, or start/restart, the docker engine must be restarted. To accomplish that automatically follow the steps below
|
. SSL Certs In Dataport/IIGIf a client wants to update SSL certs in Nginx, they can go through these instructions for more details What is an SSL certificate?An SSL (Secure Sockets Layer) certificate is a digital certificate that authenticates the identity of a website and encrypts information sent to the server using SSL technology. Encryption is the process of scrambling data into an undecipherable format that can only be returned to a readable format with the proper decryption key. What are Certificate Chains?A certificate chain (or Chain of Trust) is made up of a list of certificates that start from a server’s certificate and terminate with the root certificate. What is SSL Certificate Chain Order?The SSL certificate chain order consists of root certificates, intermediate certificates, and a server’s certificate. Root CAs are a trusted source of certificates. Intermediate CAs are bridges that link the server’s certificate to the root CA. There are three parts to the chain certificates
For an SSL certificate to be authenticated by the web browsers, it must be authentic and issued by a trusted certificate authority embedded in the browser’s trusted store. If your SSL certificate isn’t issued by a trusted certificate authority, i.e., if it isn’t issued by a Root CA, then the connecting device or web browser will continue to check if the issuing CA was issued by a root CA. It will keep going back down the SSL certificate chain order to find the root CA. If it finds a root CA, a secure connection will be established. If it doesn’t find a root CA, then the connection will be dropped, and your web browser will display an error message that reads “invalid certificate” or “certificate not trusted.” How To Update SSL Certs In Dataport
How To form a bundle .crt file
(OR) Example GoDaddy:
Other SSL providers with a single intermediate certificate:
Other SSL providers with multiple intermediate certificates:
Additional step if the private key is password protected:
Now you have the bundled cert and private key ready, do the below steps to update these files in the Nginx container: Step 1:
Step 2:
Step 3:
If NGINX does not come back as successful, then do not proceed to the restart of NGINX. A successful output looks like this.
Step 4:
A successful restart of NGINX looks like this
Step 5: Verify that the NGINX container is running
|
| Dataport Upgrade - Appendix - 5 | ||||||||||||
|---|---|---|---|---|---|---|---|---|---|---|---|---|
Integration Gateway upgrade using manual steps
1) Authorization to Access Integration Gateway Docker Images
2) Find and stop the dataport container
3) Save the previous version of dataport
4) Pull and Run N2N's Integration Gateway image.
Auto Restart the containers
OptionalStep: Remove the renamed running container. Dataport is the container name
5) Add Database Credentials.
|


Was this article helpful?
That’s Great!
Thank you for your feedback
Sorry! We couldn't be helpful
Thank you for your feedback
Feedback sent
We appreciate your effort and will try to fix the article