What is the Illuminate Integration Gateway?
The Illuminate Integration Gateway, also called the Dataport, is a tool used to provide the Illuminate platform with access to data that is located in physically and logically secure configurations, such as behind a firewall in the organization’s data center. The Integration Gateway provides a secure, encrypted channel to transport this data to the Illuminate cloud environment, where Illuminate creates a secure Application Program Interface (API) access platform.
How it works?
N2N provides a Docker container that runs Illuminate's Integration Gateway (IIG). This is installed on a Virtual Machine (VM) that is provided by the University and typically hosted on the University's network. The IIG is used to facilitate secure communication between the University database and the Illuminate Platform without having to allow direct external communication to the actual database. VM setup is operating system specific, please refer to your onsite System Administrator for VM setup.
What is the current version of the Integration Gateway?
Illuminate Integration Gateway is at Version 4.13
Note: Prior versions of the Illuminate Integration Gateway were branded "Illuminate Dataport"
What do we provide?
N2N provides a Docker image with the following software packages included:
- Tomcat 9.0.62
- JVM 11.0
- Illuminate Integration Gateway Project 4.13 (the N2N application code)
General System Requirements
General system requirements for installing the Integration Gateway:
Software
- Docker 17.x version or higher
Hardware (VM)
- 4 to 8 CPU Cores (processors)
- 8GB to 16GB RAM
- Enough disk space to run the OS and other supporting software (recommended disk space 40+ GB)
|
What is Docker and why does N2N use this?
What is Docker?
Docker is the world's leading software containerization platform. Docker containers wrap a piece of software in a complete file system that contains everything needed to run: code, run time, system tools, system libraries – anything that can be installed on a server. This guarantees that the software will always run the same, regardless of its environment. Containers isolate applications from one another and the underlying infrastructure while providing an added layer of protection for the application.
| For more info https://docs.docker.com/ |
Why does N2N use Docker for the Illuminate Integration Gateway?
The Docker platform provides N2N with a simple, effective way to deliver the right package of software to the Illuminate Integration Gateway. Docker allows N2N to combine tested versions of software with validated configuration files into one deployment package. This process greatly reduces the number of manual steps, which improves reliability and robustness, as well as making deployment faster!
Supported Platforms for Python and Docker
| Platform | Docker | Python | Podman(Link below) |
| CentOS | Yes (up to version 7 only) | Yes | Yes(version 7 and above only) |
| Red Hat Enterprise Linux | Yes (7.1 to 7.9 versions only) | Yes | Yes(version 8 and above only) |
| Debian | Yes | Yes | |
| Fedora | Yes | Yes | |
| openSUSE | Yes | Yes | |
| Amazon Linux | Yes | Yes | |
| Oracle Linux | Yes | Yes | |
| Ubuntu | Yes | Yes |
| This Setup does not support Microsoft Windows 10 Home And Pro. Red Hat Enterprise Linux (RHEL) 8 and 9 do not support the Docker package, as Podman has replaced Docker as the preferred container runtime. For more details: https://podman.io/ For N2N IIG setup using Podman: https://n2nservices.freshdesk.com/support/solutions/articles/11000127336-illuminate-integration-gateway-installation-using-podman Note: Ensure that the operating system platform meets all the required prerequisites |
Prerequisites
- Whitelist N2N NAT IPs:
- QA: 23.20.165.255/32
- PROD: 54.204.165.208/32
- Instance for IIG setup
- Open port 443
- Install Python 3.9 or higher
- Install Docker 17.x or higher
- SSL certificates(Chain cert and Private Key)
- FQDN, which connects to the Integration Gateway on HTTPS
| Note: pip3 is mandatory for running these scripts, ensure Python 3.9 has a pip3 package manager On Ubuntu / Debian (Linux): sudo apt update sudo apt install python3-pip RHEL-based Linux system like CentOS, Amazon Linux, or Fedora: sudo yum update sudo yum install python3 |
| A Docker module is also needed along with the Docker RPM package, install the module at first and then install the Docker RPM package, use the below command to install the module On Ubuntu / Debian (Linux): sudo apt install python3-docker RHEL-based Linux system like CentOS, Amazon Linux, or Fedora: pip3 install docker |
Choose Integration Gateway Type
- New/Upgrade Installation
- If you are setting up a new IIG installation or upgrading an existing one, choose this option.
- If you are setting up a new IIG installation or upgrading an existing one, choose this option.
- Establish Connection ( Skip this if you choose above option )
- If establishing a connection with the existing IIG, please select this option and go directly to APPENDIX-1 below.
- If establishing a connection with the existing IIG, please select this option and go directly to APPENDIX-1 below.
New/Upgrade Installation
- Sign in to the Illuminate application(either QA or PROD) and click on Connections tab from left side menu

- Then select “New/Upgrade Installation” for new Illuminate Integration Gateway setup and choose IIG version
- Click the “Submit” button to generate a downloadable TAR file. Once downloaded, upload the TAR file to the target server or instance where IIG needs to be installed


Setup Process
The IIG automation process is divided into THREE steps:
- Installation process
In this step, the required Docker containers, dataport and nginx, will be installed - SSL configuration process
SSL certificate configuration will be implemented at this stage - Database configuration process
At this step, database configuration details will be added to establish a connection to the data source for the dataport
Installation Process
- Once you upload the tar file onto the server, untar the tar file using below command and rename the folder with mv command
tar -xvf iig-***.tar -C /opt mv iig_4.13/ iig |
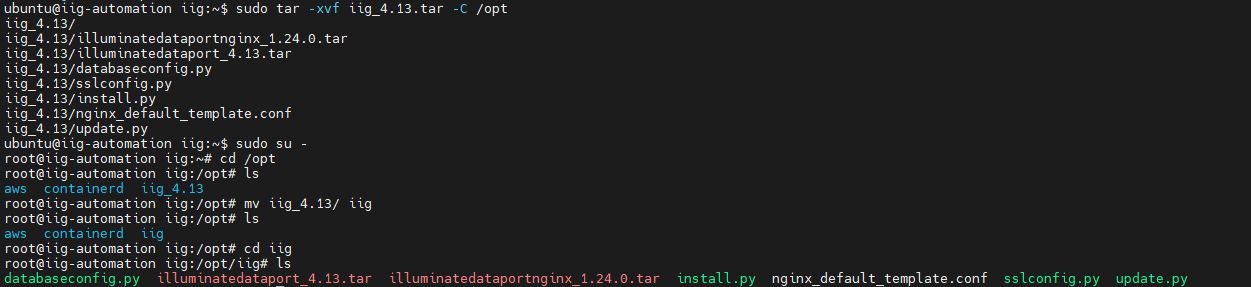
Go to the directory with the below command and run the install.py, this python service will create docker network and run the docker containers dataport and nginx
cd /opt/iig
./install.py
Note: If the file has insufficient execute permissions, configure the permissions chmod +x install.py

Verify the docker containers and the docker network


Go to the directory with the below command and run the install.py, this python service will create docker network and run the docker containers dataport and nginx
./install.py
Note: If the file has insufficient execute permissions, configure the permissions chmod +x install.py
Verify the docker containers and the docker network
SSL Configuration Process
- Run sslconfig.py python service, it will prompt you for a few mandatory details, please provide them

- This step is a NAT IP check where it will ask if the NAT IP is whitelisted. Provide 'Y' if it is whitelisted; otherwise, the script will stop at this point

- Select the specific IIG Setup environment. Please choose the environment number based on your requirement (e.g., 2)

- This setup is a port check where it will ask if port 443 is open in the firewall rules

In this step, you need to provide the Fully Qualified Domain Name (FQDN) that points to the IIG server. The script will create a
data/user.jsonfile under/opt/iigto store the FQDN

The next section is about SSL certificates, where you need to enter the full path to the complete SSL certificate(chain cert) and the matching private key that are uploaded on the server. The script will also create a folder named
sslunder/opt/iigto store the SSL files.
Note:
|

The SSL files and the Nginx configuration file will automatically uploaded into Nginx docker container

At the end of this script, the
/idpdataport service is triggered to ensure that the SSL configuration has been applied successfully

Database Configuration Process
- Run databaseconfig.py python service, it will prompt you for a database details, provide them according to the database provider

In this section, the script checks if the IIG server can reach the database host using the provided database host and port. If the connection is not successful, the script will exit at this point

- In the Database Configuration section, the script will prompt you to select the database provider type. Choose the provider by selecting the corresponding number
- After selecting the database provider type, the script will prompt you to enter the database information specific to the selected provider
Example: Oracle Database Connection
Example: MySQL
- In the next step, the script will prompt you to enter the authorization token from Illuminate App. To obtain it, log in to the Illuminate App UI, navigate to the 'Connections' tab, and add the DataPort URL


After adding the DataPort URL, click on 'Add Database Provider' and enter the required details. Once you click the 'Save' button, the authorization token will be generated

Copy the Authorization token and paste it on the server

After you press Enter, the script will automatically generate a curl command based on the selected database provider. Verify the details and respond with 'yes' or 'no'

- The database properties will be added to the dataport, and the dataport container will automatically restart via the script to apply the changes to the database

At the end, the folders
/opt/iig/ssland/opt/iig/dataare deleted, and the idp status is displayed. Finally, the script prompts you to confirm the deletion of the IIG setup Python scripts and the/opt/iigfolder.

We can also verify the IDP status in the IlluminateApp UI, which confirms that the setup has been completed successfully.

| The following appendices serve as references for various topics and concepts related to the N2N IIG setup. |
APPENDIX-1: Establish Connection
- If you choose Establish Connection for an existing setup, make sure to validate the HTTPS DNS

Once the DNS validation is complete, click "Submit"

- Add the database provider and generate an authentication token to establish a connection with the existing IIG. This step applies to both adding a new database connection and updating or reestablishing an existing connection when there are changes to the credentials (e.g., host, username, password, etc.)


- Upon saving the configuration in IIG, an authentication key will be generated, which remains valid for 5 minutes. A new token can be generated at any time by clicking the View button in the actions section

- To establish a connection between a dataport and a database using an authorization token from Illuminate, you would typically use a cURL command that includes the necessary headers for authentication. Ensure you include the correct endpoint and any required data in your request
curl -X POST 'http://yourdns/idp/addDBproperties' -H 'Authorization:Token from Illuminate connections page in Step 2' -H 'Content-Type: application/json' -d '{"DBHost": "0.0.0.0","port": "1234","SID": "","ServiceName": "servicename","DBUsername": "username","DBPassword": "***********"}' |
| The above Curl command works for OracleDB. So for different SIS’s the connection info will be different, choose appropriate connection info from APPENDIX-7 below. |
APPENDIX-2: Integration Gateway Setup For PROD On The Same QA/TEST Server
If the client wants to set up a PROD integration gateway on the QA host, they need to follow these steps
- Run the install.py script with the argument
prod. This will create a Docker network namediig_prod, launch the Docker containerdataportProd, and attach the Docker network to bothnginxanddataportProd
| ./install.py prod |
The script will ask for the fully qualified domain name attached to the server. Once entered, it will display the idp2 status


Run the databaseconfig.py Python service with the argument
prod, and it will prompt you for the database details. Provide them according to the database provider
| ./databaseconfig.py prod Note: If no argument is provided the scripts will default to the QA setup |
APPENDIX-3: Integration Gateway And Nginx Upgrade
If the client wants to upgrade integration gateway(dataport or dataportProd) and Nginx, they need to follow these steps
- Download the upgraded dataport tar file from the IlluminateApp UI and copy it to the server
- Run the following command to back up the database properties stored in dataport
| docker cp dataport:/usr/local/tomcat/webapps/idp/WEB-INF/classes/<yourdbfile>.properties /opt/ |
- Run update.py with the argument
dataportto update dataport to the latest version. The updated dataport will automatically attach to the existing Docker network, while the previous version will be renamed todataport.bkand disconnect from the Docker network
| ./update.py dataport |

- Run the following command to restore the database properties in the upgraded dataport
|
To upgrade dataportProd hosted on the same server, replace the dataport argument with dataportProd and run the restore database properties commands |
To upgrade NGINX, run update.py with the
nginxargument. This will copy the SSL certificates and config files from the existing NGINX to the new NGINX Docker container and automatically attach it to the existing Docker network. If dataport and dataportProd are hosted on the same server, the new NGINX container will connect to both the Docker networks that dataport and dataportProd are connected to. The previous version of NGINX will be renamed tonginx.bkand it will disconnect from the Docker network
| ./update.py nginx |

APPENDIX-4: SSL Certs In Dataport/IIG
If a client wants to update SSL certs in Nginx, they can go through these instructions for more details
What is an SSL certificate?
An SSL (Secure Sockets Layer) certificate is a digital certificate that authenticates the identity of a website and encrypts information sent to the server using SSL technology. Encryption is the process of scrambling data into an undecipherable format that can only be returned to a readable format with the proper decryption key.
What are Certificate Chains?
A certificate chain (or Chain of Trust) is made up of a list of certificates that start from a server’s certificate and terminate with the root certificate.
What is SSL Certificate Chain Order?
The SSL certificate chain order consists of root certificates, intermediate certificates, and a server’s certificate. Root CAs are a trusted source of certificates. Intermediate CAs are bridges that link the server’s certificate to the root CA.
Chain Certificate And Its Order
- Server Certificate: The server certificate is issued to the specific domain the user needs coverage for.
- Intermediate Certificate: Intermediate certificates act as middle-men between the protected root certificates and the server certificates issued out to the public. There will always be at least one intermediate certificate in a chain, but there can be more than one.
- Root Certificate: A root certificate is a digital certificate that belongs to the issuing Certificate Authority. It comes pre-downloaded in most browsers and is stored in what is called a “trust store.” The root certificates are closely guarded by CAs.
For an SSL certificate to be authenticated by the web browsers, it must be authentic and issued by a trusted certificate authority embedded in the browser’s trusted store. If your SSL certificate isn’t issued by a trusted certificate authority, i.e., if it isn’t issued by a Root CA, then the connecting device or web browser will continue to check if the issuing CA was issued by a root CA. It will keep going back down the SSL certificate chain order to find the root CA. If it finds a root CA, a secure connection will be established. If it doesn’t find a root CA, then the connection will be dropped, and your web browser will display an error message that reads “invalid certificate” or “certificate not trusted.” |
How To Update SSL Certs In Dataport
- Ensure you have a private key
- Create a full certificate bundle for NGINX using one of the methods below, depending on how your SSL provider delivered the certificates to you.
How To Form A Bundle .crt file
|
[OR]
Example GoDaddy:
cat signed_ssl.crt gd_bundle.crt > dataport-test-school-edu.crt Note: Above gd_bundle assumes both intermediate and root |
Other SSL Providers With A Single Intermediate Certificate:
| cat signed_ssl.crt intermediate1.crt root.crt > dataport-test-school-edu.crt |
Other SSL Providers With Multiple Intermediate Certificate:
| cat signed_ssl.crt intermediate1.crt intermediate2.crt root.crt > dataport-test-school-edu.crt |
Additional Step If The Private Key Is Password Protected:
If your private key is password-protected, we will need to make a copy without that password to use on the NGINX instance. If you run these commands and are not prompted for a passphrase, your SSL key did not have a passphrase. If you are prompted for a passphrase, enter it when prompted. |
NGINX will not properly restart if the private key is password protected.
- Hence, run the below command to turn the password-protected to a file.
| openssl rsa -in private.key -out dataport-test-school-edu.key |
APPENDIX-5: Optional Step To AutoStart The Containers After A Server Reboot
The above command starts all the containers within the docker engine of the server |
APPENDIX-6: Maintenance Steps
Docker/Containers -Current Status Check
- Look for the “healthy” status on the three containers
| docker ps |
- Checking logs
|
- Manual Stop/Start/Restart of a Container
|
APPENDIX-7: CURL Command Connection Info
| Database Type | Connection Info |
|---|---|
Banner/Oracle | {"DBHost": "0.0.0.0","port": "1234","SID": "","ServiceName": "servicename","DBUsername": "username","DBPassword": "***********"} |
SQL Server | { "DBHost": "0.0.0.0", "port": "1234", "databaseName": "", "DBUsername": "username", "DBPassword": "***********" } |
SQL Server with no port | { "DBHost": "0.0.0.0","instance":"POWERCAMPUSDB", "port": "", "databaseName": "", "DBUsername": "username", "DBPassword": "***********" } |
Informix | { "DBHost": "0.0.0.0", "port": "1234", "databaseName": "", "DBUsername": "username", "DBPassword": "***********","informixServer": "" } |
Sybase | { "DBHost": "0.0.0.0", "port": "1234", "databaseName": "", "DBUsername": "username", "DBPassword": "***********"} |
| curl -X POST 'https://your_dns_name/idp/addDBproperties' -H 'Authorization:Token from Illuminate connections page in Step 2' -H 'Content-Type: application/json' -d 'Grab the database type from below table and choose appropriate connection info' |
Was this article helpful?
That’s Great!
Thank you for your feedback
Sorry! We couldn't be helpful
Thank you for your feedback
Feedback sent
We appreciate your effort and will try to fix the article